How to fill out a DS-160 form for a US visa
Where to find the DS-160 Form, Completing the DS-160 Form, Save your DS-160 Form!
Related Article: How to Secure an Expedited or Regular US visa appointment in Canada.
Hands up who has seen a DS-160 form…Anybody? I’m not seeing many hands and frankly I’m not surprised! I sometimes wonder if anyone at the US consulate has seen one either ! The DS-160 form is an elusive beast that, unless you know its name and number, you will be blissfully unaware that this is where it all starts when applying for a US Visa appointment.
Now, we have covered the process of applying for the US visa in other articles so on this occasion we’ll go over how you fill one of these rare creatures out.
Where to find the DS-160 Form
The first step is to hunt down the DS-160 online. I will give you a head start with the website where it can be found because time is precious: https://ceac.state.gov/ceac/ Once you are on this website you then need to click on the type of form you need depending on the reason you are travelling to the US. For example if you are applying for a non-immigrant visa then the DS-160 is for you and you can see that at the top of the list of options.
Completing the DS-160 Form
From here on it’s fairly self explanatory and you are probably wondering what could be hard about filling out a form with information that you have known your whole life, like your name and date of birth. Unfortunately, many applicants make mistakes on this very important information.
There are very few exceptions on the DS-160 that allow you to leave any questions with a blank answer. Usually these contain “If” phrases like, “If shown on passport” OR, “If known.” These phrases don’t appear often, which means that when they ask you where you will be staying in the US, they really do want to know the specifics. You CANNOT progress further through the form without providing the information they want to know, so have the answers ready.
Remember to read the notes that appear on the right side of the page as guidance. If the notes tell you to estimate something, then they are asking you for a rough idea of when you will be traveling, for example. Maybe you don’t know where you will be staying, but if you know the city and state then find a suitable hotel and that will suffice until you are more sure of your plans after you receive your visa.
Save your DS-160 Form!
It is also extremely important that after the completion of every page you save your application to your computer.
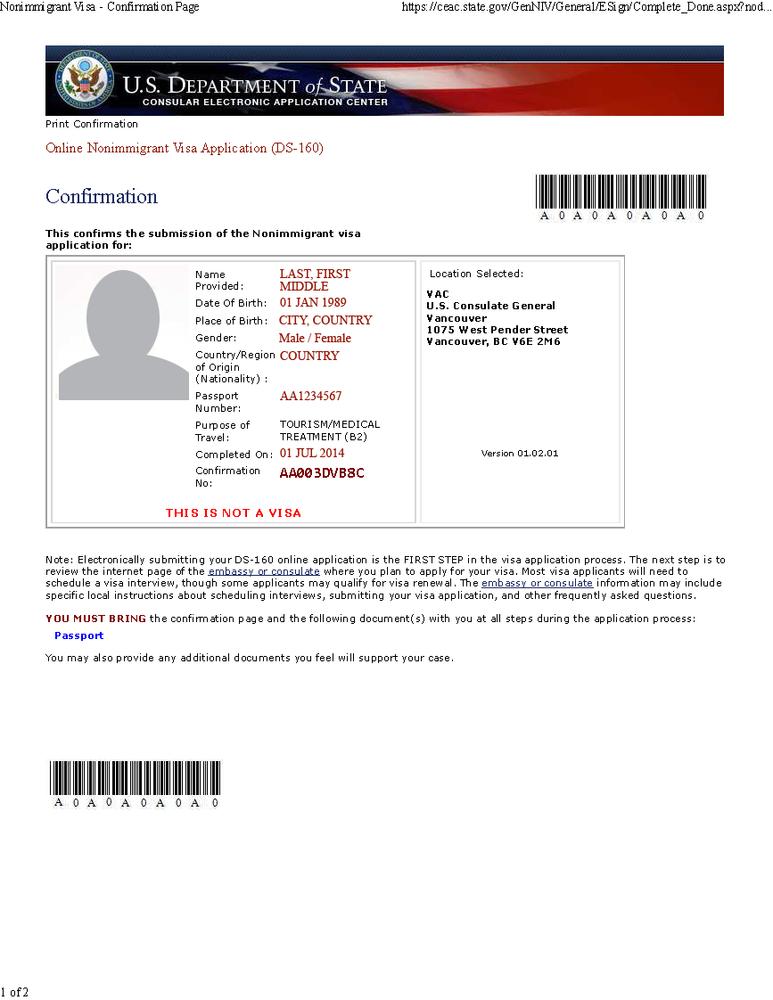
At the start of your application you will be issued your DS-160 confirmation. WRITE THIS NUMBER DOWN…IN MORE THAN ONE PLACE! I’m emphasizing this point because without this number you will be unable to retrieve your application if you have to leave it at some point to return to later. Nobody wants to have to complete this form more than once. Life is far too short to have to type your information multiple times. Make a note of the number -it always starts with AA followed by some numbers and more letters.
Once you have worked your way through the form you will eventually get to the part where you are asked to upload a picture. If you weren’t frustrated before, this is where it can be make or break. Before you totally lose your mind and decide that you will cancel your trip to the US because your correctly sized picture that is pixeled to perfection REFUSES to upload, don’t panic! You can take two passport sized photos with you to your interview – this is absolutely 100% acceptable. Phew!
If you have made it this far, all that’s left is for you to give your application a final review and to sign and submit your form. This doesn’t mean literally sign it. You just have to click on the ‘sign and submit application’ button. After this, all you need to do is print off your confirmation page. Please don’t forget to do this! If you don’t print the DS-160 confirmation page, you will have to complete the form from the beginning again. You will not be allowed entry to the US consulate without this form, and it would be a shame to have made it so far only to get turned away at the door!
If you have made it through to the end and got your confirmation page, the hardest part is over. All that’s left to do now is go for your appointment. Good luck !