Canada Visitor Visa (TRV) Course
Temporary Resident Visa Tutorial
An in-depth step-by-step guide on how to fill out your own visitor visa application
Chapter 1: Terms you need to know when getting a Visitor Visa to Canada
COVID has changed everything, at least for the following year or so. While getting a visitor visa to Canada was never automatic, for the time being you have to jump through a great deal more hoops to get that stamp in your passport. So, we’ve put together this tutorial to help you walk through the many steps you now have to take to travel on a visitor visa to Canada.
To get you started, let’s run through key terms that you will need to know to successfully navigate the new requirements and travel to Canada.
Related article to read, Who needs a Visa to come to Canada.
- ArriveCAN
- This is an app you must download (or go to the webpage) and use to provide required information to Canadian authorities before you travel to Canada, and after you first arrive in Canada. Think of it as an electronic platform that is used to ensure you follow the quarantine restrictions and do your required COVID testing and self-assessment. We’ll cover it completely in a later chapter.
- Non-discretionary travel
- This means travel that is NOT for tourism purposes. It might be to unite with a family member in Canada as we explain in a following chapter, or to conduct business, or to participate in an approved international single sports event, or even for health care workers to come to Canada to assist with the COVID prevention and vaccination programs, for example.
- Discretionary or optional travel
- This means tourism-related travel to Canada. Aside from a few exceptions which we detail in a later chapter, it is mostly forbidden for now.
- PHAC
- This stands for the Public Health Agency of Canada and is the governmental agency that determines rules pertaining to public health and has a key role in the testing and quarantine restrictions that are currently in place in Canada.
- You can apply to PHAC for a letter authorizing you to visit Canada for compassionate reasons. You will still have to get a visa, however. We’ll cover this in later chapter.
- Immediate Family Member
- These are:
- the spouse or common-law partner
- the dependent children of the person or of the person’s spouse or common-law partner
- any dependent children of a dependent child
- parents or step-parents
- parents or step-parents of the spouse or common-law partner
- guardians or tutors
- Guardians and tutors are those responsible for taking care of a foreign national minor who is living apart from a parent for an extended period, for example to go to a secondary school in Canada. The guardian or tutor should be able to show they habitually reside at the same address as the minor. Officers are usually flexible in accepting documentary evidence from a guardian or tutor.
- Extended Family Member
- These are:
- Someone 18 years of age or older, is in an exclusive dating relationship with the person (who is also 18 years of age or older), has been in such a relationship for at least 1 year and has spent time in the physical presence of the person during their relationship
- a dependent child of the person in the exclusive dating relationship
- a child of the person, of their spouse or common-law partner or of the person in the exclusive dating relationship
- a dependent child of a child (in other words, a grandchild)
- a sibling, half-sibling or step-sibling of that person or of the person’s spouse or common-law partner
- a grandparent of the person or of that person’s spouse or common-law partner
- Please note that siblings are brothers and/or sisters
- Written Authorization from IRCC
- This is a letter that IRCC sends to you after you’ve filled out a form asking for permission to travel to Canada. Basically, the letter is proof that you are eligible to travel to Canada on a visitor visa. We’ll cover how to apply in a later chapter.
- Plese note: Fully vaccinated U.S. citizens and permanent residents no longer have to provide the written authorization as of August 9, 2021.
- Fully vaccinated travellers from other countries should also be exempted from a written authorization as of September 7, 2021 – depending on how COVID data evolves over the coming weeks and months.
- ISSE
- An International Single-Sport Event. In other words, if you’re an athlete in an individual sport competition/event.
- Deputy Minister of PCH = Deputy Minister of Canadian Heritage (also known simply as Deputy Minister of Heritage). The PC in PCH refers to Patrimoine Canadien (Canadian Heritage in French). You will have to write a letter to the Deputy Minister of PCH/Heritage if you want a visa to participate in an ISSE.
- COVID Pre-entry Test
- This is a test to see if you have COVID which must be taken within 72 hours of boarding your flight to Canada. We’ll cover this in a separate chapter below.
- Arrival Testing
- In addition to your COVID Pre-entry Test, you will have to get tested at your Port of Entry (the airport you arrive at) or at a nearby facility. The details will be covered in a later chapter.
- Test Kit
- As well as pre-entry tests and arrival tests, you also will be given a test kit to use on day 8 of your quarantine in Canada.
- Quarantine Plan
- You must have a 14-day quarantine plan with a place of quarantine (which is not your government-authorized hotel) and details on how you will obtain food and medicine and self-isolate for the period.
- Come to Canada tool
- This is a set of questions used to determine your eligibility. Go here to use the tool, but please remember that the final determination on your eligibility to come to Canada will be made by IRCC officials at your Port of Entry or before you enter. Here’s the Come to Canada tool’s webpage. Scroll down until you see the following:
- These are:
- These are:

It is recommended that you use the Come to Canada tool before you begin to apply for your Visitor Visa. When you use the Come to Canada tool, you’ll get a Personal Reference Code. Keep this for when you begin to apply online for your visitor visa. See Chapter 13 for more details on applying online for your Visitor Visa.
Because of evolving COVID restrictions, we’ve put together a tutorial on how to comply with the numerous and changing rules for travelling to Canada. You can read all the details in our tutorial here.
Now let’s look at applying for your visitor visa to Canada.
Hire Immigroup for Paid Support – click here
Chapter 2: Forms to fill out & Getting your application package
Before reading the rest of our Visitor Visa tutorial, we recommend that you check out the requirements and rules arising from COVID restrictions at our tutorial on COVID travel restrictions here.
Now, let’s start looking at the “normal” part of your visitor visa application. Here are the forms you’ll have to fill out and submit:
- IMM 5257 – Application for Visitor Visa
- Go here and right click on the link. Then choose “save link as …”.
- Save it to your hard drive and then open it from your Windows Explorer/Files.
- IMM 5645 – Family Information Form – Visitors, Students, and Workers
- Go here and right click on the link. Follow the steps directly above.
- IMM 5707 – Family Information Form – Visitors, Students, and Workers
- Go here and follow the same steps.
- IMM 5484 – Document Checklist – Temporary Resident Visa (Visitor Visa) outside of Canada
- Go here and follow the same steps.
The next forms we list for you are applicable only in certain situations, so you may or may not have to download them and fill them out, depending on your specific situation:
- IMM 5721 – Document Checklist – Applicants in Canada
- Go here and follow the same steps.
- IMM 5409 – Statutory Declaration of Common-law Union
- Go here and follow the same steps.
- IMM 5476 – Use of a Representative
- Go here and follow the same steps.
- IMM 5475 – Authority to release personal information to a designated individual
- Go here and follow the same steps.
In the following chapters, we’ll go through each of these forms, including the optional ones. We’ll explain in what circumstances you may have to fill them out and submit them.
Before getting into the individual forms, you should go here to see which of the above listed forms you will have to submit. Scroll down until you see this:

Your application package will depend on the country from which you are applying. This will normally be your country of residence, but there may be situations where you apply from outside your country of residence, in which case you should choose the country you are staying in when you file the application.
Select the appropriate country from the drop-down list and click on Get documents.
Chapter 2a: Summary Letters and Letters of Invitation
A Summary Letter and a Letter of Invitation may not be officially required by IRCC when you apply for a Visitor Visa, but they are a crucial part of a well-planned and successful application.
Here’s why:
A Summary Letter basically sums up your case for being eligible to travel to Canada in a concise and easy to read way for immigration officials. As we’ve explained at Immigroup, putting together a successful Summary Letter involves a little planning and some clear execution.
Go here to read our blog and see how to get a Summary Letter (also called a Cover Letter) done, and how to have it reviewed by a professional.
A Letter of Invitation is a letter inviting you to come visit Canada so you must know someone in Canada in order to have them write you a Letter of Invitation. Again, we’ve dealt with this topic at Immigroup.
Go here to read a step-by-step guide about putting together a successful Letter of Invitation and having it reviewed by an immigration consultant.
Remember, one of the main reasons people get rejected for a visitor visa is because immigration officials doubt that they will return to their home country at the end of their visit to Canada. An invitation letter helps to clear up your purpose for visiting Canada.
We strongly suggest you include a Summary Letter and – if possible – a Visa Invitation Letter. They will improve your chances of a successful visitor visa application. And yes, as we explain in our linked blogs, the country you are applying from does affect your chances of success. Some countries have lower success ratios for visitor visas and if you are applying for a visitor visa from these countries you should definitely include both a Summary Letter and a Letter of Invitation (if you know someone in Canada who can write the Letter of Invitation of course). They can’t guarantee you success, but they will help your chances.
Let’s take a look at Summary Letter (A Letter of Explanation) that clarifies some details for a theoretical Visitor Visa application:
Summary Letter Visitor Visa Tutorial
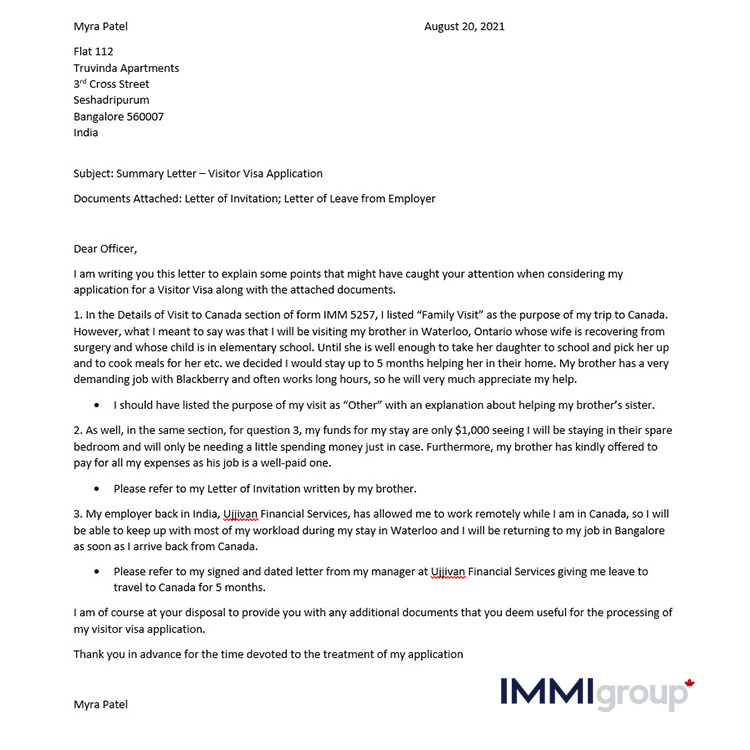
As you can see, the applicant – Myra Patel – is clarifying some important points that may have caused doubts on the part of the immigration officer reviewing her application, specifically form IMM 5257 which we’ll dig into in the following chapter.
In addition, our applicant Myra Patel will also include a Letter of Invitation from her brother who lives in Canada and with whom she’ll be spending several months. Here’s the sample Invitation Letter:
Letter of Invitation Sample Bangalore
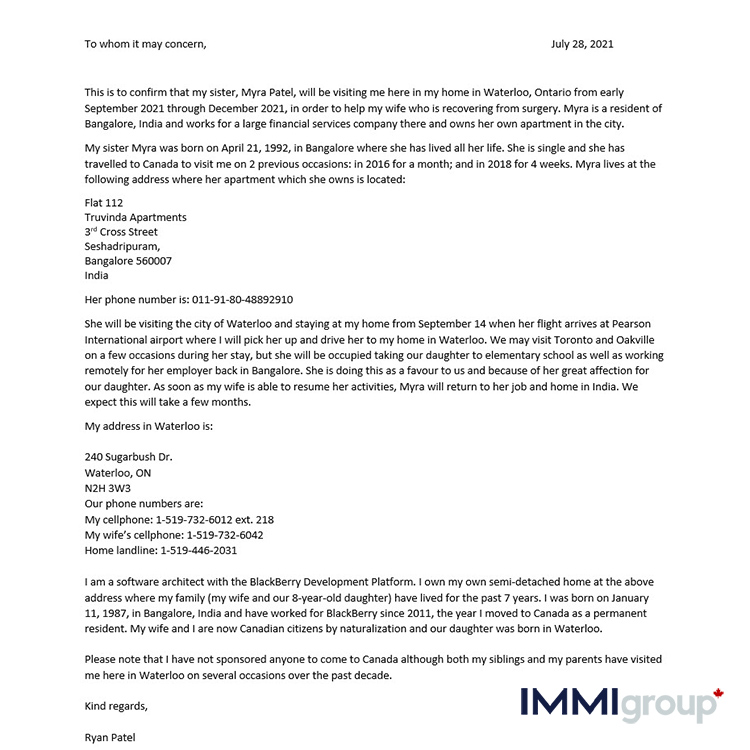
As you’ll see when you click on the link to our blog on Letters of Invitation, a well-constructed invitation letter needs to convey specific information that IRCC officials will find useful, like addresses and phone numbers and a few personal details about the person being invited and the person who is writing the letter of invitation. Here’s the link again to read our blog on Letters of Invitation.
You’ll also note that Myra mentions in her Letter of Explanation that she has obtained a letter of leave form her employer in India allowing her to travel to Canada for several months while giving her the opportunity to work remotely while she is Canada. This should be signed by her manager and on official company letterhead.
Click here to read our article called, ‘How to Get Visa Invitation Letter for Canada is 6 Steps’.
When to pay a professional and when to do it yourself.
We’re about to dive into the forms you need to fill out for a visitor visa application. As you consider the task ahead, ask yourself the following:
Does any of the following apply to you?
- Have you previously applied for and obtained visas to other first word countries like the United States, Europe, and Austria?
- Do you work for a big multinational or a company with at least 1000 employees and the employer will be providing a letter stating that you are on, for example, vacation and will be back to work in the near future?
- Do you own property and/or your total assets total over USD$80,000?
- Do you have a family (kids and spouse) and they are not coming with you on the trip?
If you answer Yes to at least 2 of the above questions, then maybe you can dive in and do the application yourself. If not, you’re facing a tricky task ahead.
There are a few more requirements to consider, however, that have to do with your perspective on a visit to Canada and your attitude to the visit. Do any of these situations apply to you?
- If I get it great but if I don’t it not a big deal.
- You should definitely do it yourself.
- I have previously obtained a visa before to Canada and I am just getting a new one.
- You should definitely do it yourself.
- I have a university degree and I am detailed orientated and with a little time and work I can understand government jargon and instructions.
- Do it yourself and maybe hire someone to review it.
So, if it’s your first visa for Canada, if your visit is really important to you, if paperwork and forms overwhelm you a little, then it’s likely time to consider getting a professional to help you put together your application, or at least to review it.
Now let’s dive in and see how to fill out each of the forms you will need for your application.
Chapter 3: Form IMM 5257 – Application for Visitor Visa (Temporary Resident Visa)
Related article ‘How to Complete the IMM 5257 Application for a Temporary Resident Visa‘.
It’s now time to look at your visitor visa application form. We’ll go through the form, step by step to show you how to fill it out.
Often, IMM forms do not open directly from a link given at IRCC’s website. To download IMM 5257 (and any other IMM forms you might need), go here and right-click on the link for the form.
- Select Save link as … which saves the form to your hard drive.
- Open your windows explorer (also called file explorer) and double click on the saved form to open it.
- Select PDF to open it.
- You will need Adobe Acrobat’s latest version. Go here (PLEASE PUT LINK TO ADOBE ACROBAT IN CANADA. I KEEP GETTING SENT TO ADOBE’S LATIN AMERICAN SITE IN SPANISH) to download it.
Here’s what you’ll see when you open form IMM 5257

- You may not have a UCI or unique client identifier. If this is your first application with IRCC, then you won’t have one. In that case, leave the box (field) blank.
- Choose Visitor Visa for question 3.
- Please write your family name (last name or surname) and given name exactly as it is written in your passport or other travel document.
- Only answer question 2 if you have used other names in the past. Otherwise, click on the No
Scrolling down the form we next see the following:

While questions 6 and 7 are fairly straightforward, make sure you answer questions 8 and 9 correctly.
- For question 8, tick the Yes box of you have lived for more than 6 months at some point over the past 5 years in a country other than your country of residence.
- If you tick Yes, then fill in the information on the country or countries aside from your current country of residence that you’ve been in.
- For question 9, if you are applying from a country other than your country of residence (even if you have only been there for a short while) tick Yes and fill in the requested information on that country.
Next you have question 10 which asks you about your current marital status.

- Make sure you choose the correct type of marital status from the drop-down list. For example, widowed means someone whose spouse has died.
- Do NOT write in the large box below the fields for question 10. This is for immigration officials use.
Next, you’ll see this:

If you have been in a common-law relationship tick Yes and provide your common-law partner’s or spouse’s personal details. With the languages section don’t forget to tick whether you have taken an English or French proficiency test (like IELTS or TEF).
Let’s move on:

- In the US PR Card section, this is asking you if you have a Green Card and are a lawful permanent resident of the U.S.
- In your contact information if you have to submit by mail, make sure to include an email address if you would prefer to maintain communications with IRCC by email rather than your through your current mailing address.
Next, we have:

- Only fill in your residential address if it is different from your mailing address, in which case you should tick the No box and fill in the information. Otherwise, tick the Yes box and leave it blank.
- If you fill in an email address, make sure to frequently check for emails from immigration authorities. They will have one of the following domains:
- @cic.gc.ca
- @canada.ca
- @international.gc.ca
The next section is where you give details of your planned visit to Canada, including the purpose of your visit:

- Question 1a – Purpose of my visit – has a drop-down menu with the following options of which you must pick one:
- Business
- Tourism
- Short-term studies (course or program of 6 months or less)
- Returning student
- Returning worker
- Super visa – parents and grandparents
- Other (medical visit, transit etc.)
- Family visit
- Visit
- If you choose Other in 1a) give further details in the following box/field 1b).
- IMPORTANT: Under current pandemic rules, do NOT select Tourism or Visit, unless you are a citizen or permanent resident of the U.S. A good option is to choose Other and then give more details in the box in 1b).
Next, we have Education and Work history:

- Check the Yes box if you have any post-secondary education including apprenticeships.
- With Employment you need to give details of your previous 10 years, including whether you studied or weren’t working or studying for a period. Do NOT leave any gaps. They basically want to know what you did over the past 10 years.
We now get to the tricky part of your application form. The following questions can be troublesome for your entry to Canada. Let’s see how


These questions should be answered truthfully with details provided in the boxes directly below the questions. Notice that you may be requested to fill out IMM 5257 Schedule I if you answer yes to any of these questions in order to give more detail and ensure you are not accused of human right violations nor have a criminal record.
Finally, we have:

First, you should click No or Yes, depending on whether you wish to allow IRCC to share your information, subject to the privacy requirements they state.
At this point, you now need to go to the beginning of the form and click the Validate button and check if you have forgotten to fill out any required fields. Then you can print the form and date and sign it if you are 18 or older.
- If you are under 18, a parent or legal guardian must sign and date the form.
- If you have filled out the form on a computer (seeing you have to apply online this will be true in the great majority of cases) you should have a barcode page printed out. Remember to place the barcode page at the top of your application – if you are applying through the mail.
Chapter 4: IMM 5645 or 5707 – Family Information Form
As we explained in chapter 9, your application package will depend on which country you’re applying from. Specific to this chapter, your Family Information Form will either be 5645 or 5707. Let’s start with IMM 5645.
Everyone over 18 coming to Canada on a temporary permit (visitor, student, or work visa) must fill out this form. Here’s the first Section A, where you give personal information:

- Tick the Visitor box and remember to write your names BOTH in English and in your native language.
- Include ALL family members even if they aren’t travelling with you.
- Tick the YES or NO boxes on the LH Side to indicate whether each family member is coming with you to Canada for your visit.
- In the Marital Status drop-down menu, physically present and not physically present refer to whether they were present at the wedding ceremony. These two marital status states are only shown for the spouse/common-law partner.

- If you don’t have a spouse or common-law partner, sign and date the statement certifying this to be true.
- Include ALL your children (biological, adopted, and step-children) in Section B.

Section C asks for details of ALL your brothers and sisters (whether half-brother or sister or stepbrother or sister or biological). This section only appears in IMM 5645 and NOT in IMM 5707. If any sibling or parent or child has died, indicate this in the Present Address space and give the city and date in which they died.
- If you have no children, sign and date the statement certifying to that.

Finally, Section D (Section C in IMM 5707) asks you to certify that the information is true and to recognize that this information will go into your immigration record and be checked against future applications/dealings you may have with IRCC.

This last image is for IMM 5707 which is identical to 5465 except it DOES NOT have a section on siblings (brothers and sisters). As the arrow shows, it goes straight from children to certification. In other words, IMM 5465 seems to be for people from countries where IRCC believes there are more risks involved and so asks for more information than form IMM 5707 does.
Chapter 5: IMM 5484 or 5721 – Document Checklist
There are two possible document checklists, one for people applying abroad (IMM 5484) and one for people applying from inside Canada (IMM 5721).
Let’s start with IMM 5484 – people outside Canada – as this is by far the most typical situation of someone applying for a visitor visa to Canada.

The first thing you should note is that your Document Checklist (whether IMM 5484 or IMM 5721) is not just a useful checklist to make sure you have submitted all the required documents. It’s also obligatory. It has to be included in your application.
As well, although the instructions tell you to consult with your local visa office about translations, you should always, if possible, obtain a certified translation into English or French of any documents that are not in either official language.

As we’ll explain below, IMM 5476 – Use of a Representative is only to be filled out if you have appointed or are cancelling a representative.
As to how to pay the fees, this will depend on where you are applying from. Check with your local visa office or Visa Application Centre (VAC).
As well, if you have to give biometrics (which will be the case for most visitor visa applicants) then you do NOT have to send printed photographs.


Note that you must provide proof of legal status in your country of residence if it is different from your country of citizenship. As well, minors travelling with only one parent must provide either custody documents or a letter of authorization from the other non-accompanying parent.
We will explain Parent and Grandparent Super Visas in another blog.
IMM 5721 is a slightly simplified Document Checklist that does NOT include IMM 5707 or 5465 – Family Information form. Remember that IMM 5721 is only for applicants inside Canada.

Chapter 6: IMM 5409 – Statutory Declaration of Common-law Union
This form is only to be filled out if you have a common-law partner (someone you have been living together with in a conjugal relationship for at least 1 year). It has only a couple of sections. Let’s take a look:

The first part requires you to state your names, your location, and how many years you have co-habited for. The declarant is you, the applicant for a visitor visa. The declarant’s partner is your common-law partner. If you get this backwards, your form IMM 5409 will be rejected and you will have to provide another IMM 5409 correctly filled out.
Then questions 1 through 4 ask about any evidence you have to support your claim of co-habitation – insurance policies, joint bank accounts, shared ownership of properties etc. If none of questions 1 through 3 apply, use question 4 to provide other proof.

The LH Side is where you write your name while the RH Side is where you sign. This seems obvious and trivial but when you’re filling out a number of forms it’s a mistake people sometimes make. Read everything carefully and check twice before writing or signing anything.
You will have to declare in front of an official qualified for taking declarations like a Notary Public, Commissioner of Oaths, or Commissioner of Taking Affidavits in Canada. Abroad, you most likely will have to swear in front of a notary.
What is the legal cost in the immigration industry for visitor visas?
A fair price in the immigration industry will be from $1000 to $2000 depending on the number of supporting documents that must be submitted with your application as well as the length of the summary letter. You can also pay as much as $5000 from boutique law firms.
Hire Immigroup for Paid Support – click here
Chapter 7 – IMM 5476 – Use of a Representative
As usual, we like to give you plenty of information that you can act on. It should also be clear by now that even a Visitor Visa Application can be a surprisingly lengthy and detailed process – especially given changing COVID restrictions – where a few mistakes can slow down or sometimes even derail your application. So, if the following is true:
- You’re organized and efficient and good at detail.
- You don’t mind reading and re-reading the fine print to make sure you got it right.
- You have the time and energy to devote at least an hour a day for a month or two and not lose track.
Then continue to use this guide and after a couple of weeks (or sometimes longer, taking into account the delays in obtaining some documents) you will have completed your application!
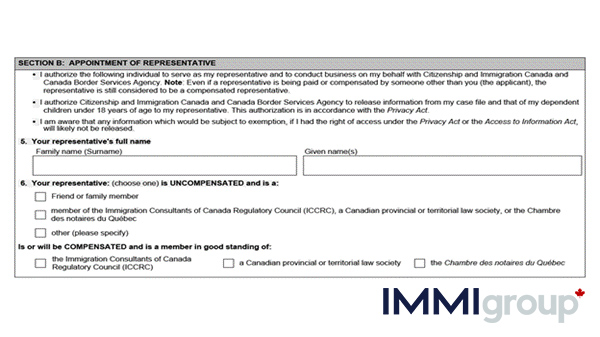
If you have doubts about whether you have the time, or patience, to do it all, then you might want to choose a representative. That means filling out IMM 5476:

As is stated at the beginning of the form:
- Your representative does not have to be paid.
- You can only have one representative per application, so if you add another representative to an application the previous representative will no longer be able to represent you.
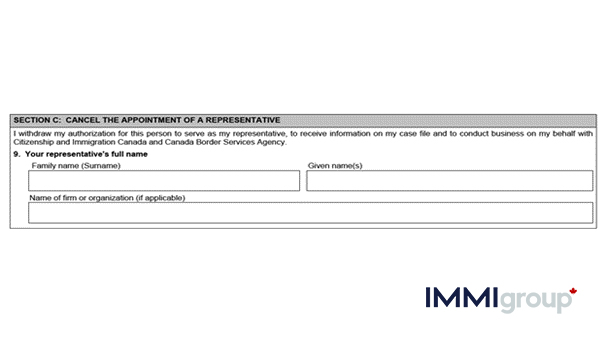
Please note that what parts of IMM 5476 you fill out depend on whether you are appointing or cancelling a representative. Tick the appropriate box and:
- Fill out sections A, B, and D if you are appointing a representative.
- Fill out sections A, C, and D if you are cancelling a representative.
If you have confidence in a friend with no legal training in Canadian immigration law, that’s your choice. We strongly suggest if you are going to use a representative that it be a Registered Immigration Consultant in good standing or an immigration lawyer. It’s always best to have someone familiar with the process to guide you.
Please note that you can also use the form to cancel a representative. Remember to choose which one you are doing by ticking the correct box.
As well, the Principal Applicant along with the chosen Representative are the ones who fill out the form in this case.
Section A lists the Applicant’s personal information, including whether they have already submitted an application which is dealt with in question 3.
- Do not forget to answer this question. While it is preferable to appoint a representative before you file your application, we understand that situations change and what might have seemed doable becomes too great a demand on your time and energy and you sometimes decide to appoint a representative after you’ve applied.
- If you already have a UCI or CI (Client identifier) include it here.
- Remember to state that you it is a Visitor Visa Application.

Section B gives information on the representative you are appointing.
Remember that if they are paid (they can be paid by a third party – someone else – but they are still your paid representative) they must be either:
· A registered immigration consultant
· A lawyer
· A Quebec notary
Please click the appropriate box.
The last two questions in this section (7 and 8) give your representative’s contact information and the representative’s signed declaration.
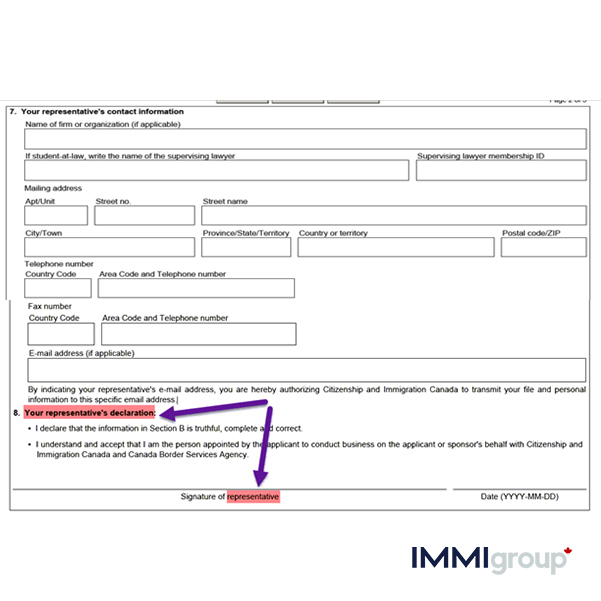
Make sure you leave the representative’s signature line blank for your representative to fill in. If you are appointing a representative, you should consult with them and they will help make sure the form is filled out correctly.
Finally, Section C is for cancelling a representative:
Chapter 7a: IMM 5475 – Authority to Release Personal Information to a Designated Individual
Only use this form if you want a relative or friend to review your application but you don’t want to appoint them your representative.
Go here to download the form, using the method describe in the beginning of chapter 10 (right click on the link and choose “save link as …” etc.) Here’s what the top of the form looks like:

Remember, the person you authorize just has the right to view your information and change your address on your application if you move but they are NOT your representative. For a Visitor Visa, it is unlikely you will need to use IMM 5475, but it may apply in some limited scenarios.
Chapter 8: How to Apply Online for your Visitor Visa
As of July 2021, you are required to apply online for a Visitor Visa. While there are a few exceptions to this rule, you should generally assume you will have to use the online method. So, let’s go through the procedure, step by step.
Go here and scroll down to the bottom of the page:
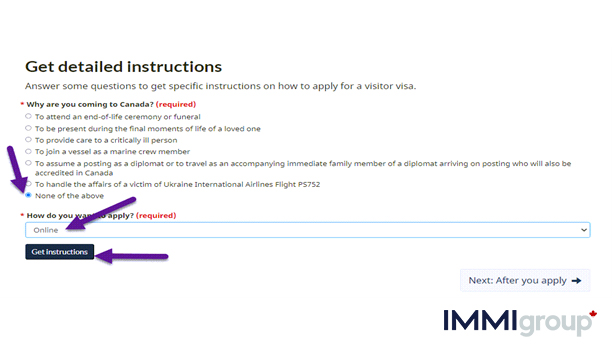
From the list of reasons, we’ve chosen none of the above (in other words, we’re not travelling to Canada for compassionate reasons, nor as a marine crew member, nor as a diplomat). We’ve also chosen Online for our method of applying. Next we click on the blue Get instructions button.
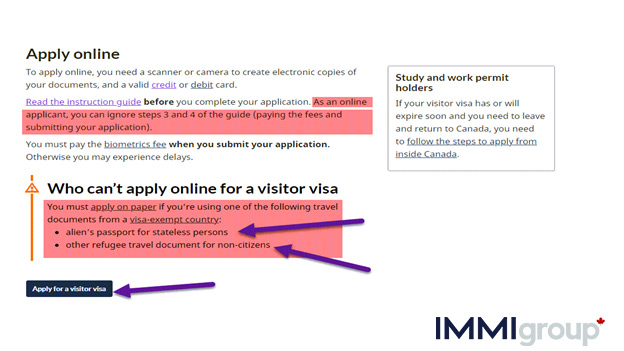
When applying online you don’t have to submit your application by mail. Please note however that if you have either an alien’s passport or other refugee travel document then you must apply on paper. We’ll cover that in a later chapter. Click on the blue Apply for a visitor visa button to begin the process
Using IRCC’s Portal
If you are applying online this also means using IRCC’s portal and GCKey – a sign-in method for accessing your IRCC account and filling out the application form. Let’s walk through the process.
Step 1: Open (or sign in to) a IRCC Secure Account.
Go here to begin the process. This is what you should see:
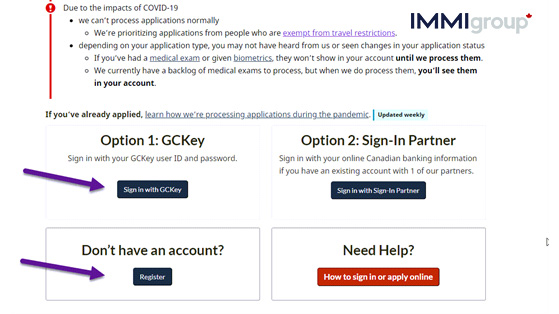
If you already have an account, then sign in with your GCKey. More than likely, you won’t have an account yet in which case you should click on the blue Register button. On the following page they give you the option of registering through:
- Your Canadian online banking sign-in
- GCKey which stands for Government of Canada Key. Most people applying for a visitor visa won’t have a Canadian banking account, so we’ll show you how to register using GCKey.
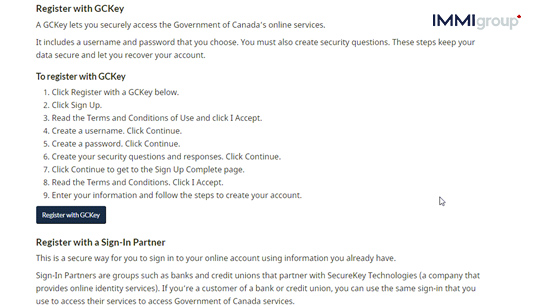
As you can see, setting up a GCKey account is much like any other account you set up to use an online page or service. So, you should click the blue Register with GCKey button and follow those steps.
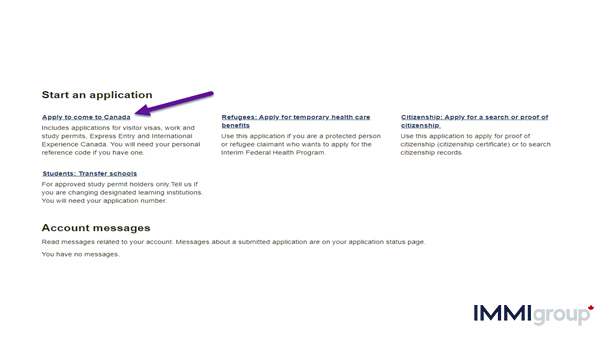
Once you’ve logged in with your GCKey account you should see this page. Click on Apply to come to Canada.
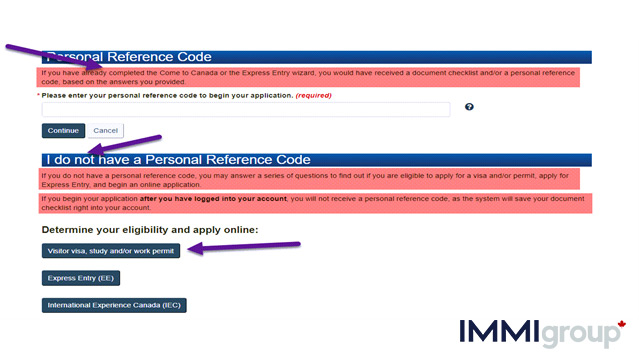
If you have used the Come to Canada tool, then you will have a Personal Reference Code. Enter it in the indicated field (box) if you have one. See our explanation of the Come to Canada tool in Chapter 1. It is essentially a set of questions to help determine your eligibility to come to Canada.
If you haven’t used the Come to Canada tool, then you choose the blue Visitor visa, study and/or work permit button.
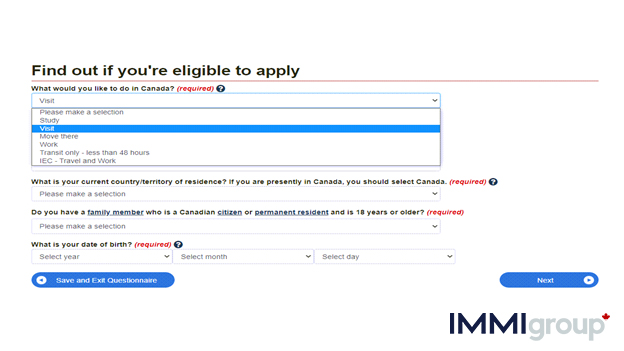
Choose the option Visit in the first drop-down menu.
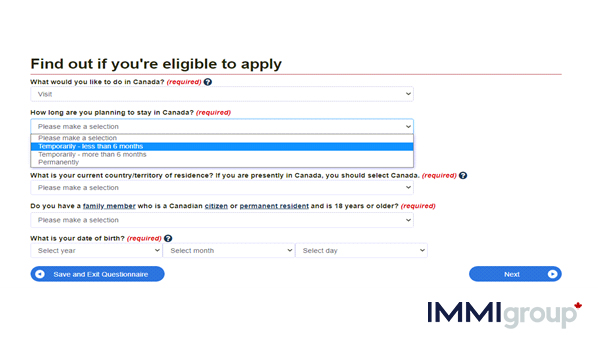
Then choose the option Temporarily less than 6 months, from the second drop-down menu. Continue filling your personal information including your current country of residence. Then you will be taken to the visa online application form.
Step 2: Filling out the Application Form for a Visitor Visa
You will be asked a question about the purpose of your visit. You should answer as follows:
- Question 1(a): Purpose of travel – choose “other” from the drop-down menu.
- Question 1(b): Description – write “COVID-19” exactly as in the quotes using capital letters.
Continue filling out the rest of the form.
Step 3: Attach (electronically) your supporting documents
You will need a scanner or camera to make electronic copies of your documents.
Remember any documents not in English or French have to be translated and be accompanied by a certified photocopy of the original document. You will have to use a notary (or equivalent) to certify the copies of the documents. So, remember for documents not in English or French you need:
- The English or French translation of the document by a certified translator
- An accompanying affidavit signed by the translator (if the translator is not certified) sworn in the presence of a notary public
- A certified photocopy of the original document with the following information written on the photocopy of the original document:
- “I certify that this is a true copy of the original document”
- The name of the original document
- The date of the certification
- Their name
- Their official position or title (Outside Canada this is normally done by a notary)
- Their signature
- PLEASE NOTE: Do NOT have a family member do your translation.
Review Chapters 3 and 4 to see what supporting documents to submit depending on your situation (immediate or extended family member of a citizen/permanent resident/registered Indian; immediate family member of a person temporarily in Canada; visiting Canada on compassionate grounds; person attending an ISSE)
PLEASE NOTE: As of August 9, 2021, fully vaccinated U.S. citizens and permanent residents (green card holders) will NO LONGER have to get a Letter of Authorization to travel to Canda. They will be able to travel as visitors (tourists).
Step 4: Pay the Fees
With a visitor visa, there are 2 types of fees:
- Processing fees
- Biometrics fees
| Type of fee | Amount (CAD) |
| Processing Fees | |
| Application fee (per person) | CAD$ 100 |
| Application fee for Family of 5 or more (applying at same time and place) | CAD$ 500 |
| Biometric Fees | |
| Biometric fee (per person) | CAD$ 85 |
| Biometric fee for Family of 2 or more (applying at same time and place) | CAD$ 170 |
Please Note: If your visitor visa application is rejected, you will NOT receive a refund.
You will need the following:
- One of the following Credit Cards:
- Visa
- MasterCard
- American Express
- JCB
- Union Pay (for online applications only – Union Pay debit cards not accepted)
- Or one of the following Debit Cards:
- An INTERAC-based Canadian Bank Debit Card
- The Debit Card must also be registered with your Canadian bank for online banking)
- Access to a printer and an internet connection.
PLEASE NOTE: If you are applying online, you will be taken directly to the page where you will pay your fees. The steps outline below are for people applying on paper. See Chapter 15 below.
To pay your fees, go here and scroll down the page until you see the following:
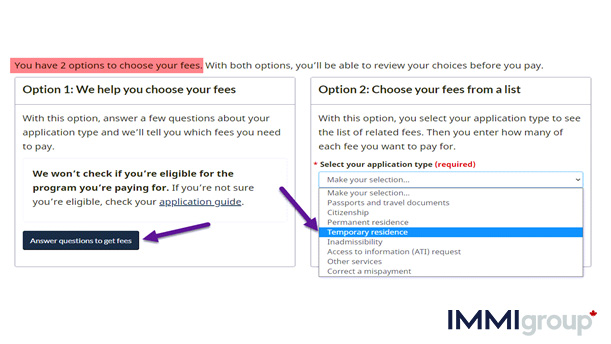
Choose one of the two options – either answer a few questions in the box on the LH Side OR choose Temporary Residence from the drop-down menu in the box on the RH Side.
Follow the instructions and pay the correct fees (you should pay biometric fees at the same time to speed up your application). Before you leave the site, make sure you PRINT your RECEIPT.
Chapter 9: Who has to use the IRCC Portal?
While most applicants for a visitor visa have to apply online using their IRCC Secure Account as detailed above in Chapter 8, there are certain visitors to Canada who additionally have to use the new IRCC Portal.
Who has to use this portal?
The following types of visitors to Canada must apply through the IRCC Portal:
- You’ll be joining a vessel in Canada as a marine crew member.
- You’ll be travelling to Canada for compassionate reasons such as:
- Being present for final moments of loved one’s life
- Caring for and/or support a sick or critically ill person
- Attending a funeral/end-of-life ceremony
- You’ll be assuming a post as a diplomat
- You’ll be an accompanying immediate family member of a diplomat
How do you apply through the IRCC Online Portal?
Step 1: Open an IRCC Portal Account
This is in addition to your IRCC Secure Account. To open your IRCC Portal Account you need to:
- Go here to open your IRCC portal account. This is what you should see:
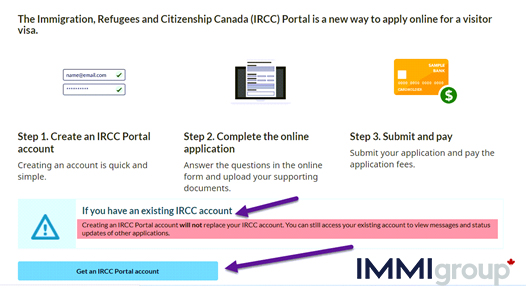
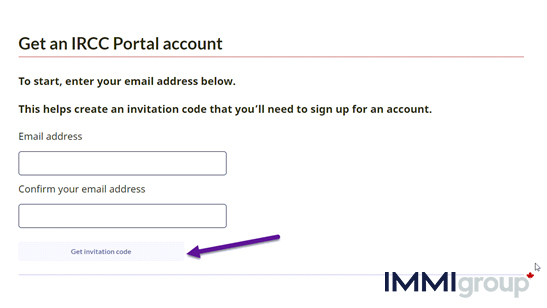
- Note that the IRCC Portal Account does NOT replace your IRCC Secure Account as the highlighted section shows. Click on the green Get an IRCC Portal account button to begin the process. You will be asked to submit and confirm your email address. Click on the light gray Get invitation code button to get the code sent to your email.
Step 2: Fill in the online application form
With your code you will be taken to your online visitor visa application form which you fill out and then electronically attach your supporting documents to.
- In the question “Tell us more about what you’ll do in Canada” give dates and locations and describe what you plan to do. As well, make sure to write “COVID-19”
Step 3: Submit the application form and pay the fees
- As mentioned in Chapter 8, the following Credit Cards are accepted:
- Visa
- MasterCard
- American Express
- JCB
- Union Pay (but NOT the debit cards for Union Pay)
- Debit cards with a Canadian Financial Institution using the INTERAC system and linked to your online banking account are also accepted.
Chapter 10: When you have to Apply on Paper – Visa Application Centres
In certain situations, you must apply on paper rather than online. If you:
- Have an alien’s passport because you are stateless, OR
- You are a refugee
Then you must apply on paper. This means a few important differences with online applications.
As explained at the end of Chapter 8, you have to go here to pay your fees. To do so, follow the instructions at the end of chapter 8.
As well, you have to submit your application by mail or courier by sending it what is called a Visa Application Centre. These are privately-run companies that have been contracted by the Canadian Government to:
- Send your visa application (as well as passports) in a secure and safe fashion to the appropriate processing centre in Canada.
- Collect biometrics (that is they are places where you can give biometrics).
- Are located in countries around the world.
- Provide services in the local language.
Send your visitor visa application to the nearest Visa Application Centre (VAC). To find your nearest VAC go here and scroll down until you see:
Use the page-menu at the bottom to scroll through the VACs until you find the one nearest you. Note that some VACs may offer slightly different services so contact your nearest VAC to see what services they offer under current pandemic restrictions.
- Please note that some VACs provide computers for you to apply online.
- As well, VACs normally provide biometrics collection points – in other words, you can give your biometrics at your nearest VAC.
- VACs will also provide service in your local language.
For visitors applying for a visa from the U.S. you should go to what is called an Application Support Centre in the USA.
Chapter 11: A Final Word on COVID and the future of visa applications for Canada
If you’ve seen our tutorial that deals with public health and travel restrictions currently in place due to the ongoing COVID pandemic, you’ll see that some restrictions are currently being modified and some (like the requirement to stay at a hotel to await the results of your Arrival Test for COVID), are being dropped altogether.
Unfortunately, it’s hard to say exactly when or even whether all of these restrictions will be completely eliminated, and the harsh reality is that some of them may remain in some form or another. In other words, the way you apply for a Visitor Visa may never be the same as it was before the pandemic.
However, the information – personal data, supporting documents, IMM forms – that IRCC uses to determine the eligibility of a person to enter Canada will remain essentially the same. As before, your chances for a visitor visa will always improve if:
- You fill out the required forms listed in Chapter 7 accurately and completely.
- You provide all the supporting documents we talk about in Chapter 3, with certified translations if necessary.
- If you are more than one person applying, the information you give in the IMM forms and supporting documents is consistent between each of your immediate and extended family members, as well as accurate.
- You pay the correct amount of fees – including your biometric fees which most visitors will have to provide.
- You or your representative provide any additional information requested by IRCC promptly and accurately.
Finally, let’s clear up a couple of frequent questions that are readers often have.
What are the odds that if I hire someone that I will get the visitor visa?
Here are two hypothetical situations:
- Our first situation involves a young woman from the Philippines who is 24 years old and single with a local job that pays her a few hundred per month. How good are her odds of getting a visitor visa to Canada?
- If she does the application on her own, the odds are terrible, at 15%.
- If she hires a professional, for example a consultant at Immigroup, her odds will double to 30%. So, in short, these are not great odds.
- Situation two, again involves a woman from the Philippines but she owns a condo, has two children and works for the Philippines government.
- If she does it on her own, the odds are 40 to 60%
- but if she hires Immigroup, the odds jump to 80 to 90%.
I was told if I hire an immigration consultant or lawyer that my visa application will have a bigger chance of getting denied. Is this true?
We are hearing this from a lot of developing nations like India, Thailand or Philippines. It’s partly an urban myth with some truth to it.
If you hire a local company that has a bad reputation of borderline fraudulent activities (for example: fake or altered documents like airline tickets or bank accounts) you are taking an unnecessary risk.
Trust us, the Canadian government knows about them and is aware of the problem. The reason we are 100% sure of this is because we have seen these altered documents with our own eyes. They are terrible and of sloppy quality. It’s very sad if you think about it, because they are ruining people lives. When you pay someone like this it’s basically putting you at a huge disadvantage. The shortcuts they promise you are illegal and will inevitably backfire.
On the other hand, when you hire someone that cares about their work and client, it will have a positive impact on your application.
Imagine this:
You are a government official working for Canada’s immigration authorities that must review and make decisions on all these applications. The truth is the majority of the application that come into your desk are poorly completed.
Now you spot a name you have seen before, from a legitimate consultant that you recognize. You breathe a sigh of relief, at least not everything today will be difficult. You pick up that file first since it’s the first thing in the morning and you may as well get your day going with something straightforward and easy.
You open the package and it’s cleanly complied, no staples but rather just paper clips and with a clean, well-written summary letter that quickly gives you a clear understanding of the case. No need to review and most likely reject the documents, because this company has never sent you anything bogus.
So, yes there are fraudulent so-called consultants out there and you have to watch out for them. Your best bet is always a Canada-based immigration consultant (or lawyer) in good standing with their regulatory body. It’s always your safest bet.
We hope you found this content to be helpful. At Immigroup we provide do-it-yourself information that is clear and accurate. (For best results, we recommend using the government’s website in conjunction with ours. For answers to specific questions, please check out our forum. Do these simple things and you’ll be far ahead of the pack!)
For those who want more expertise and support, we offer a broad range of paid services. Let us be your immigration ally, and you’ll see why most of our clients are clients for life.
Also read our article, The Real Reasons your Visa to Canada was Refused.
Hire Immigroup for Paid Support – click here