Online Applications for Permanent Residence (PR)

The government of Canada is testing out a trial version of online applications for a wide range of immigration programs, including sponsorship programs, provincial nominee programs, and Atlantic immigration programs, just to name a few. This is still a Beta version, as they say, so rest assured that you can still apply on paper if you prefer.
We’ll focus on Sponsorship programs to give you an example, but this can be used with all the approved programs listed below. So, let’s dig into some of the details of this new trial program meant to test applying online for several immigration programs, including sponsorship.
If you use this new trial online program, you need to understand that on the same online permanent residence application portal, there are two types of accounts involved:
- An account for the applicants themselves, which they will create and sign in to upload documents and fill out forms. This is the one we’ll explain just below.
- A representative’s account, which a licensed representative in good standing will create and use to submit applications online on their client’s behalf. At the end of our tutorial, we’ll add helpful tips about using this new online application program when you have a paid (or unpaid) representative.
Online Application vs Paper Application
Here is the reality with paper applications, most people assume when they mail their application by courier that because they have a tracking number that clearly states the application has been received, all is good with the world, and there’s nothing to worry about.
The hard truth is that the physical application mailroom at IRCC is a black hole!
Here is what you need to know about IRCC’s mailroom
- Your courier tracking does not help. They can’t use this information to find your application and will not (no matter how much you beg) rummage through the mailroom looking for your package.
- Your IRCC application can only be traced once assigned to an IRCC officer.
- If you have made a mistake when filling out your application and/or sent the wrong documents, you can’t ask for your application back. Instead, a long process of back and forth between you and IRCC will begin, one that can add months and sometimes even years to your application.
- In other words, you will likely be doing a lot of printing out of forms that you have to re-send.
Here is a great photo from 2019 IRCC’s mailroom (formerly called CIC or Citizenship and Immigration Canada).
A photo is worth 1,000 words. pic.twitter.com/TSdY4yRTzz
— Steven Meurrens (@smeurrens) February 23, 2021
Here is the game changer with the online application:
- You can see your application once you have submitted it.
- IRCC can also clearly see your application (if they choose to look).
- You can make corrections! This is big; nothing is more confusing and stressful when you are not sure you sent something, or you need to change something that is already sent.
- No more making two copies of everything (one for the government and one for you).
- And your application can’t be lost.
Because the system is new, I am sure there are drawbacks that only time will reveal, but the benefits are so big that everyone should be jumping on board and using this new system.
One final note, if you have a paid representative, then here are some of the additional benefits of the new permanent residence (PR) application online portal:
- They can review and clean up your work without you constantly having to scan and email.
- You can see what changes your representative is making.
- Your representative can catch problems a lot sooner and avoid disasters.
- This new system will dramatically decrease miscommunication.
Here are the programs you can apply using this new online application portal
- Provincial nominee program (non-Express Entry)
- Rural and northern immigration pilot
- Agri-food pilot
- Atlantic immigration program
- Start-up visa
- Self-employed people (federal and Quebec)
- Quebec-selected skilled workers, entrepreneurs and investors
- Sponsoring a spouse, partner, dependent child or other families – Check out Immigroup’s free course
- Sponsoring a parent or grandparent – Check out Immigroup’s free course
- Adopting a child through the immigration process – Check out Immigroup’s free course
- Protected persons and convention refugees in Canada
- Humanitarian and compassionate grounds
- Temporary resident permit holders applying for permanent residence
- Home Support Worker Pilot
Tip: Here is a powerful tool you can you to track application processing times. It even gives you information if times are getting better or worse; click here.
An overview of the basic process for applying online
Now let’s go through the steps you – the client – must take to set up your account. Remember, you have to do this regardless of whether you appoint a representative or instead submit your online application on your own.
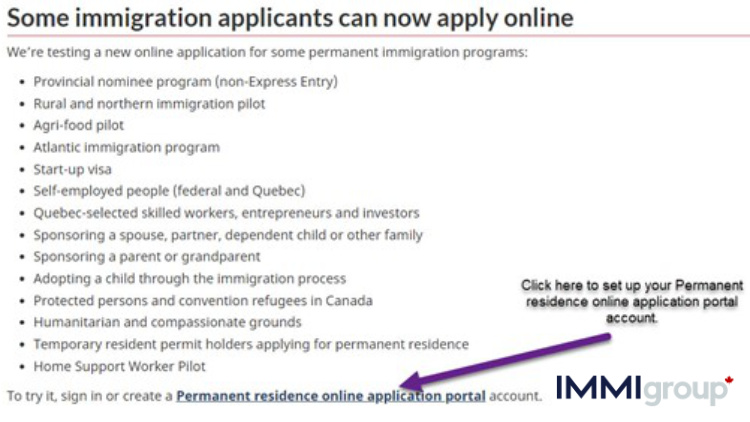
Step 1: Set up your Permanent residence online application portal account
Go to this government page that explains how to apply online. Scroll down just past the list of immigration programs until you see the link:
Click on the link, and you’ll be taken to this page:
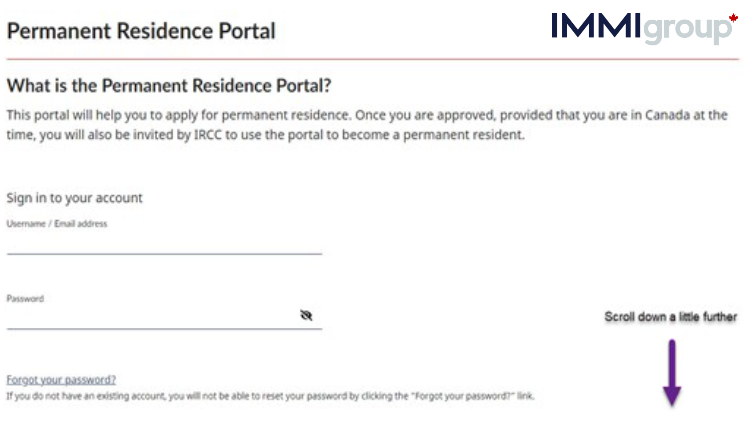
Scroll down until you see the following:
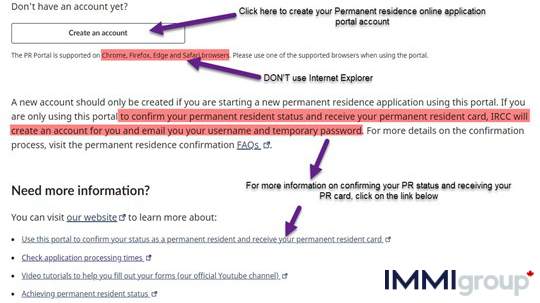
This will take you here where you set up your account with a valid email and a password you create just like any other account you set up online:
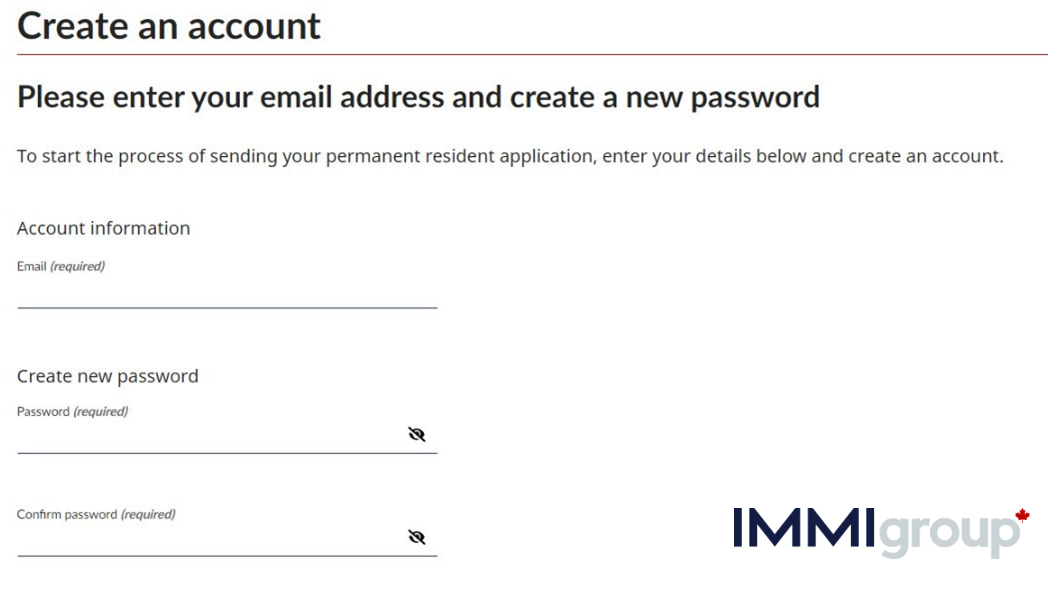
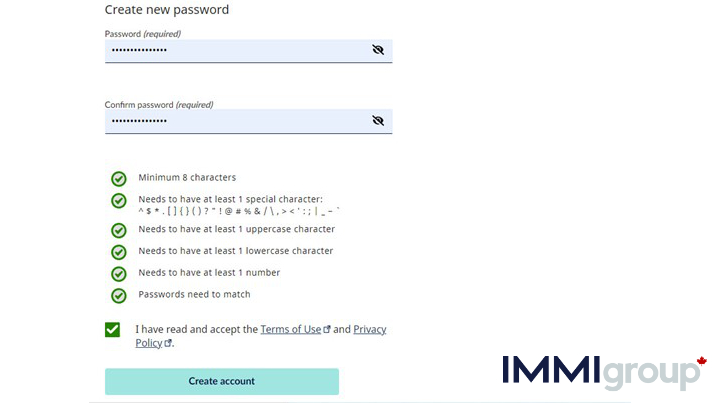
However, the password requirements are reasonably rigorous. Make sure you comply with them, or you will have to change your password until they do.
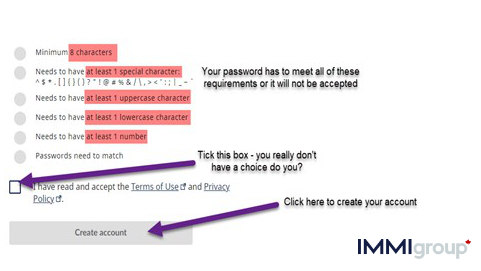
And here’s how it should look if everything’s correct:
This is what you’ll see after clicking on Create account:
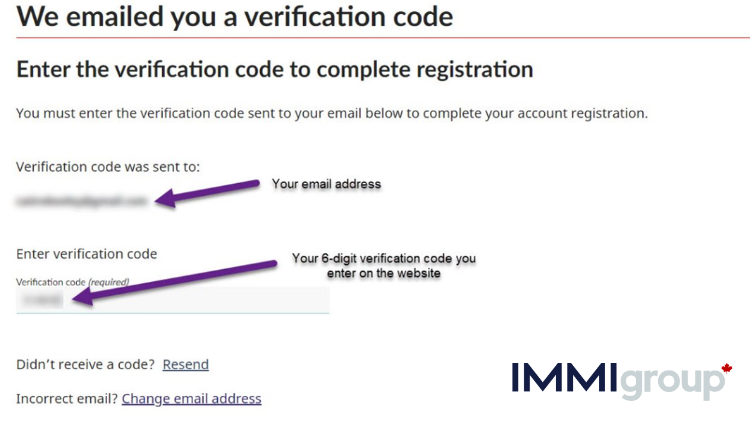
What you need to do is check your inbox for the email from IRCC with your verification code.
Here is what the email should look like. In the above image from the webpage where you create your account, all you have to do is enter the 6-digit verification code you receive in the email sent to you, as shown below:
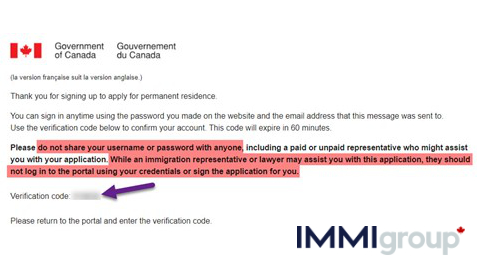
Enter the verification code. Next, you’ll see confirmation that you’ve created a Permanent residence online application portal account with IRCC:
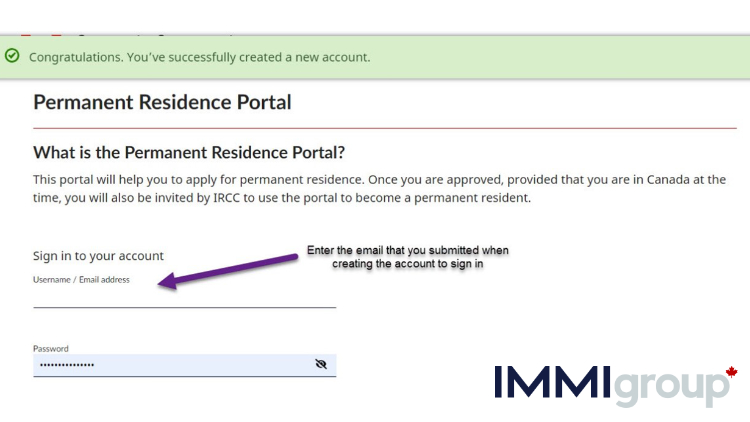
Step 2: Signing in to your account and starting your application
Sign in to your newly created account, and you’ll be taken here:

This gives you a basic overview of the three main steps involved.
- Ensure you’re eligible by clicking on the link and selecting your immigration program (Spousal sponsorship in our case), and seeing what the requirements are. You can also find that in our Sponsorship tutorial.
- Fill out the forms – digital forms you fill out directly & PDF forms you fill out, validate and then upload – and gather and upload your supporting documents. This step will take you a few weeks to do well.
- Carefully review your application and make sure you have signed and dated the appropriate forms. Then hit that Submit button.
Let’s go through the second and third main steps in more detail.
First, you should download the application guide, which in our case will be Spousal sponsorship but could be any of the immigration programs listed above. There are two groups of forms you have to complete when doing your online sponsorship:
- Digital forms are webforms you fill out at the Permanent Residence portal, where we’ve just shown you how to set up your account. These include:
- IMM 0008: Generic Application form for Canada
- IMM 5669: Schedule A Background/Declaration
- IMM 5406: Additional Family Information
- IMM 5562: Supplementary Information – Your Travels
- PDF forms you need to fill out on your pc using Adobe Acrobat (make sure you download the latest version). Use the instruction guide to help you fill out these forms, which include:
- IMM 1344: Application to Sponsor, Sponsorship Agreement and Undertaking
- IMM 1283: Financial Evaluation
- IMM 5532: Relationship Information and Sponsorship Evaluation form
- IMM 5533: Documentary Checklist (Spouse, including dependent children)
When you fill out the digital forms at the online portal, you must complete all the required information, or you cannot proceed to the next section. However, with the PDF forms, you will complete on your pc, click the Validate button to highlight fields (boxes) you may have missed and then go back and fill them out. Do this with PDF forms BEFORE you upload them to the government website. This will help you ensure they are completed and avoid sending your application back to you.
Sponsorship Instruction Guide for Online Applications
To continue, return to the government page we linked above and scroll down to the bottom until you see the following:
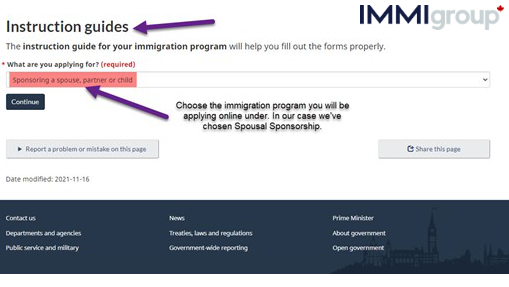
Choose the immigration program you’re applying under and click the blue Continue button to see your guide. As we’ve chosen Sponsoring a spouse, partner, or child, we have form IMM 5289: Sponsor your spouse, common-law partner, conjugal partner, or dependent child – Complete Guide. As you are going to be applying online on your behalf, please read the whole guide carefully and use it as you proceed to fill out the required forms and gather your supporting documents.
Additionally, use the Document Checklist (Spouse, including dependent children) form IMM 5533 to ensure you fill out all the required forms and upload all the supporting documents.
Please keep in mind that this is the longest stage of your online application process, and for a sponsorship application, it will often take weeks and sometimes months to complete. If you rush through everything in a couple of days – as we explain in our Sponsorship Tutorial – you almost certainly will make mistakes and/or have missing or inadequate documentation. Additionally, remember that the guide deals with how to do a paper application, so you will be using it to ensure you qualify as a sponsor and to see how to answer the questions when filling out the forms.
PLEASE NOTE: You do NOT, and unless you don’t need to sleep or eat, you simply CAN NOT do this application in a single sitting. It will take you many, many settings so you’ll be signing in and then signing out on several occasions. Think of it as a work project that will take weeks and sometimes months to complete. Sign in, do what you can that day, and then sign out. The sign-out button is near the top RHS of the webpage.
Step 3: Starting your online application
Sign in to the portal and scroll down until you see the following:
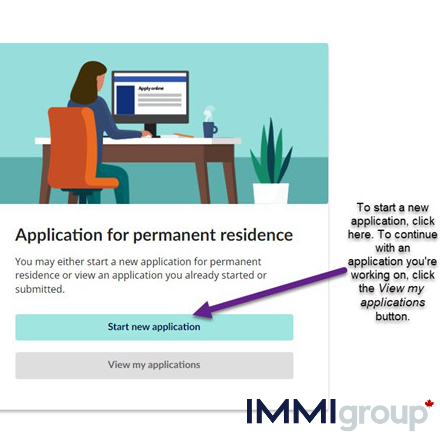
Click on Start new application to begin the process. You’ll see the following where you will fill out what kind of permanent residence program you’ll be applying for:
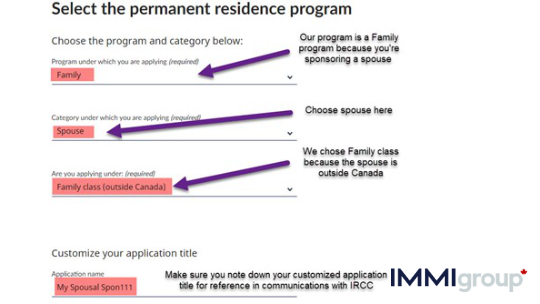
Once you’ve chosen the correct program – to understand the programs, categories, and the difference between Family class and Spouse or Common-law partners in Canada class, see our Sponsorship Tutorial – then scroll down and click Continue.
You’ll then be given a chance to edit the information you’ve just submitted (type of program, category and class). Review carefully to ensure the information is correct, and click the Edit button if you have to correct something.
Then scroll down to see the list of forms you have to fill out. This is what you’ll see:
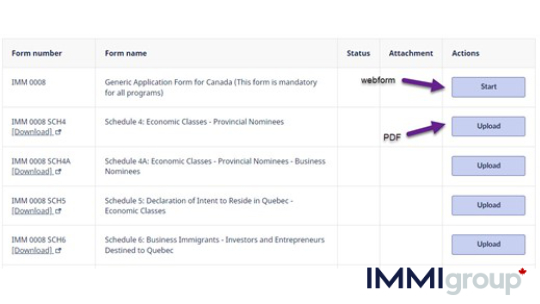
The list of immigration forms continues with several forms covering all the PR immigration programs available online. ONLY choose the forms required for your immigration program. In our case, it’s spousal sponsorship – family class, as shown in the instruction guide. Please note that:
- the forms that have a Start button are the digital forms, and
- those that have an Upload button are the PDF forms.
Labelling Supporting Documents for uploading
If you scroll down further, there are instructions on how to label documents that you will be uploading. Please read them carefully:
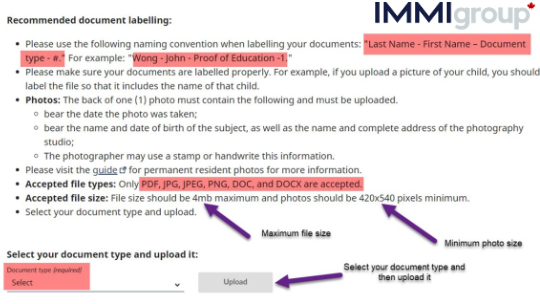
Please select your document type from the drop-down list and click on the Upload button when it’s ready.
Please note the file types allowed are the following: PDF, JPG, JPEG, PNC, DOC, & DOCX. Any other file type will not be accepted.
As we mentioned above, if you sign out of your online application, you can return at any time to continue working on it, and you should now click on the View my applications button as shown below:
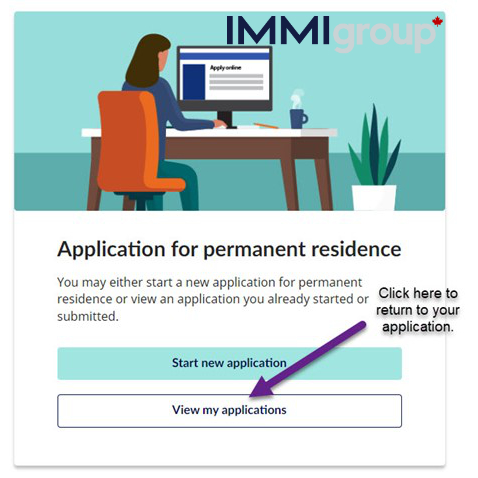
On the next page, scroll down until you see the following:
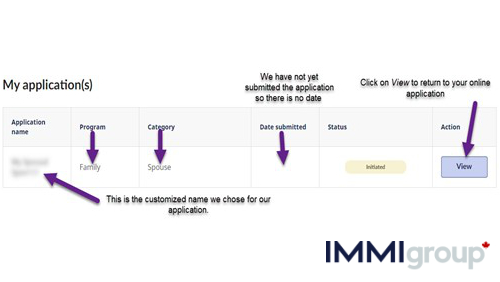
Note that your application will be identified by the customized name you chose in step 3 above. Click on View to return to your application and continue filling out forms and uploading supporting documents.
Step 4: Paying for Fees & Uploading your receipt
On the same page as the list of forms and the instructions on naming supporting documents, you will see the following if you scroll down a little:
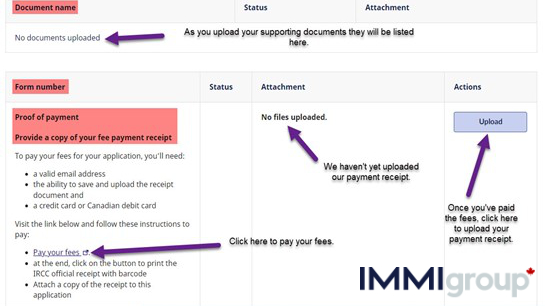
This is where you upload your proof of payment as your payment receipt. Remember to have everything you need before paying your fees, including:
- A valid Credit Card or Canadian Debit Card
- Knowing how to save and upload your payment receipt
- A printer to have a paper copy of your receipt as a backup – although saving the receipt on your pc is the primary step you should know how to do.
- A valid email address which you will need to set up your Permanent residence online application portal account.
Once you have everything ready, click on the link shown in the image to pay your fees. Make sure you then save your receipt with the bar code images. Then click on the Upload button to upload your payment receipt. Your online application will not be complete until you pay your fees AND upload your payment receipt.
Step 5: Review & Submit
That’s it. But remember to carefully review your forms and uploaded documents. Use the Document Checklist – IMM 5533, a PDF form – to ensure you have filled out/uploaded all the required forms and uploaded your supporting documents. Then when you’ve double-checked everything, hit the submit button, and you’re done!
And as we’ve reminded you several times, this online application portal can be used for any of the 14 immigration programs listed below. Just choose the immigration program that you want to apply online for, as we explained in Step 3 above, and you’ll then be shown what digital forms to fill in, what PDF forms to upload, and what supporting documents to upload.
- Provincial nominee program (non-Express Entry)
- Rural and northern immigration pilot
- Agri-food pilot
- Atlantic immigration program
- Start-up visa
- Self-employed people (federal and Quebec)
- Quebec-selected skilled workers, entrepreneurs and investors
- Sponsoring a spouse, partner, dependent child or another family
- Sponsoring a parent or grandparent
- Adopting a child through the immigration process
- Protected persons and convention refugees in Canada
- Humanitarian and compassionate grounds
- Temporary resident permit holders applying for permanent residence
- Home Support Worker Pilot
TIP: Did you know that even if you’re applying online to sponsor someone, you can still use a representative (whether paid or unpaid) to help you through your online application? However, please remember that there are a few things you need to know.
If you appoint a representative for these types of online applications, the application process is shared between you and your representative as follows:
- The client and the representative create their accounts at the Permanent residence applications portal.
- A representative CAN NOT create a client account on their behalf. The client must create an account. However, a representative can use SCREEN-SHARING technology to help walk a client through the process, but the client must do it on their pc.
- The representative – in the representative’s account – then provides their client’s name and email address, and IRCC sends an email directly to the client’s email informing them that their representative is applying on their behalf.
- The representative then chooses which immigration program the client is applying under and then begins to fill out the forms and gather the supporting documents from the client for uploading.
- If any form – like IMM 5476: Use of a Representative – requires a third-party signature (for example, someone other than the principal applicant and the sponsor in a sponsorship application), then that form must be printed, and both the principal applicant and the sponsor, as well as the third party (usually a dependent child or a representative), must sign it BY HAND.
- Next, the representative fills out all the forms online and uploads all supporting documents and a copy of the fee receipt.
- Then the client goes to their account and reviews the application and electronically signs their application (basically typing your full name correctly in the appropriate box) on the consent and declaration page of form IMM 5669.
- The representative then ticks the Declaration box on form IMM 5669 and then submits the form electronically.